Teaching players to convert or at least make smart plays with bad sets is a very important and tough task for most coaches at any level. Coaches want players to be aggressive and smart “Taking Out The Trash” (#5 “What Great Looks Like!” – The Volleyball1on1 Playing Standard) set, thus lowering the opponents opportunity to score in transition while most importantly not making a hitting error.
This four drill progression will effectively help young players learn:
- How to call for the ball / set
- Be aggressive and “Take Out the Trash”
- Good technique for hitting and tipping
- Understand hittable vs. playable balls
- Learn overhand ball control, meaning how to attack a volleyball with 10% – 75% power and control
- Learn how to tip with purpose
- Learn how to read the block and defense when attacking
- Learn how to manage stress as an attacker
- Learn the attacking hierarchy when “Taking out the trash!” (#5 “What Great Looks Like!” (™) – The Volleyball1on1 Playing Standard)
- #1 – Know the Defense,
- #2 – Take Out the Setter,
- #3 – Hit the Corners,
- #4 – Take Out the Middle,
- #5 – Take Out the Outside,
- #6 – Set Up Our Defense!
Taking Out the Trash
Taking out the trash is language used by Volleyball1on1 coaches and players to describe what a hitter needs to do when attacking the ball in transition or off a bad pass and set. For our hitters we follow the philosophy that you are not going to get good sets normally in transition. Rather “Trash” sets are the norm and you should expect that you need to “Take out the trash,” meaning kill bad sets. This mindset results in a different pursuit of excellence in terms of “What Great Looks Like.” ™
Players are re-enforced that making smart shot selections should be the primary focus with no hitting errors verses trying to get a aggressive kill in transition.
For youth high school and youth club this is particular important given the very low sideout / kill percentage on average. The weaker the volleyball level the more important this concept is of “Taking out the trash,” and “no hitting errors.”
Hittable vs. Playable Balls
Hittable ball is a ball that is set, bumped, passed dug or anything else that is above a players shoulders who is contacting it next. Hittable balls as it implies means that players should try make an overhand attack on the ball.
A playable ball by contrast is a ball that is below a players shoulders and as such can only be played underhand, in most cases with a bump or pass over the net. The player can just make a play on the ball to get it over the net.
Teaching volleyball players the difference between the two is critical because too often balls that are hittable become playable and when this happens the opponent gets a easier ball to transition with the result that they have a higher attack / kill percentage on the play.
Good Technique
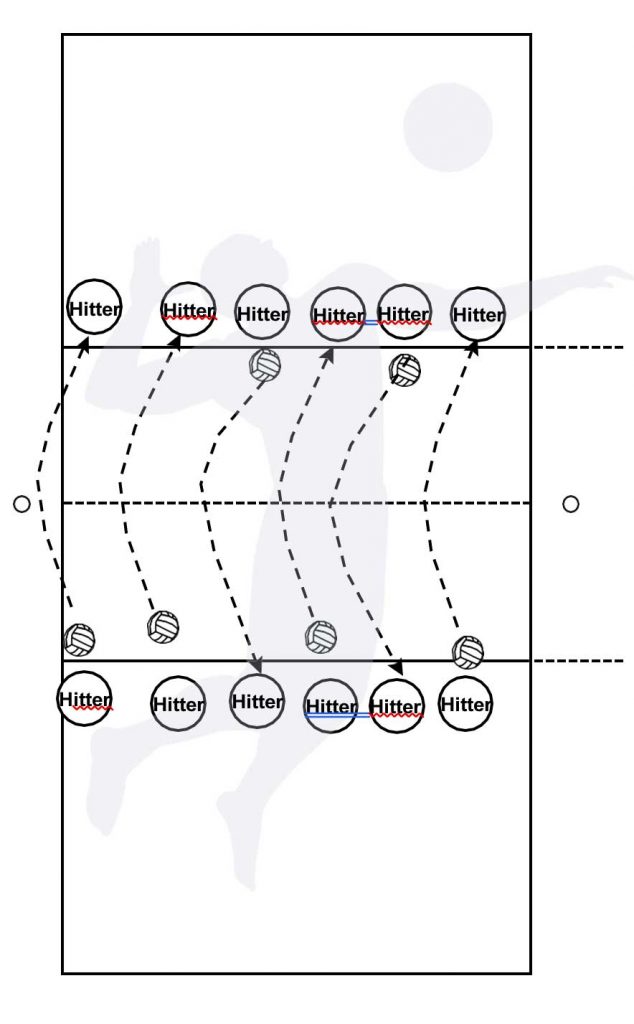
Hittable vs. Playable Balls Drill 1
Part 1 – Drill 1: Controlled Hits – Focus is Hitting Technique
Players two handed toss the ball to themselves and hit the ball over the net to each other. The goals is a controlled hit with a high contact and controlled wrist snap. Also players move their feet to get to the ball. Shoulders can be square to the target. Goal is hitting with different levels of power ranging from 10 – 70 percent.
Goal of this drill sequence is to teach players good technique when attacking “Hittable Balls!” Drills 1-3 works on decision making, being aggressive and hitting balls. Drill 4 works on tipping and shots.
Calling, Step-Close, Being Aggressive and High Contact
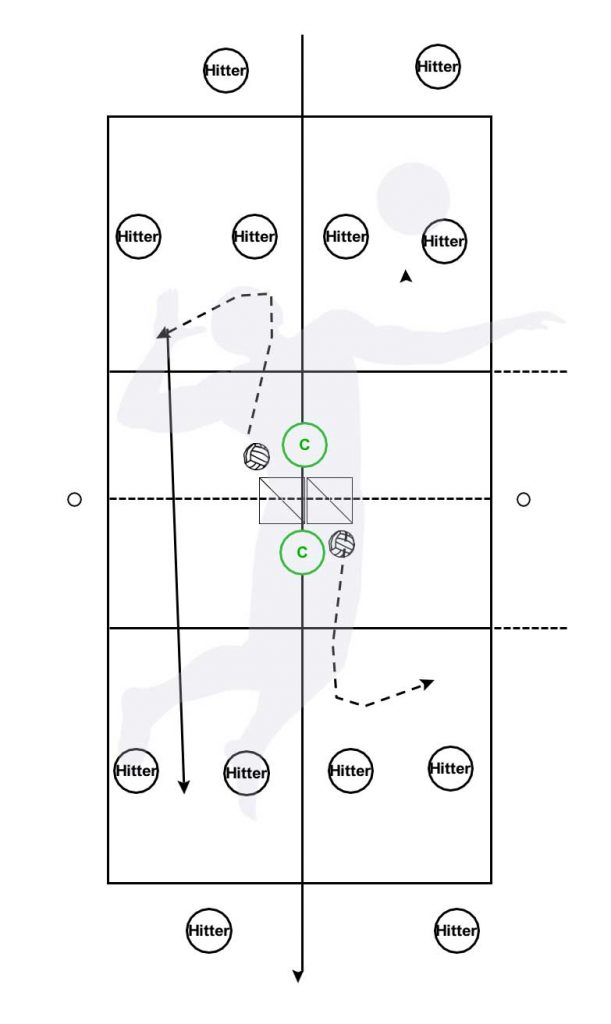
Hittable vs. Playable Balls Drill 2
Part 1 – Drill 2 – Hittable vs. Playable Balls and Calling
Goal is players calling for the ball. Player then deciding if the ball is hittable or playable. Hittable balls players play overhand and playable balls players play underhand. Players need to learn to be very aggressive with this drill early especially on hittable balls. As the players get more comfortable coaches should demand a higher level of consistency.
In running this drill coaches should face each other and toss to the side the other coach is not tossing. Then alternate and repeat. This drill is chaotic and forces players to concentrate or be hit in the face. The chaos leads to deeper learning in our opinion because of the variability. We want coaches and players to embrace the chaos and aim for lots and lots of aggressive reps. Do not play the drill out initially as it reduces the number of reps.
Hitters come in out the back for the person who hit.
Developing an Attacking Priority Checklist When “Taking Out the Trash”
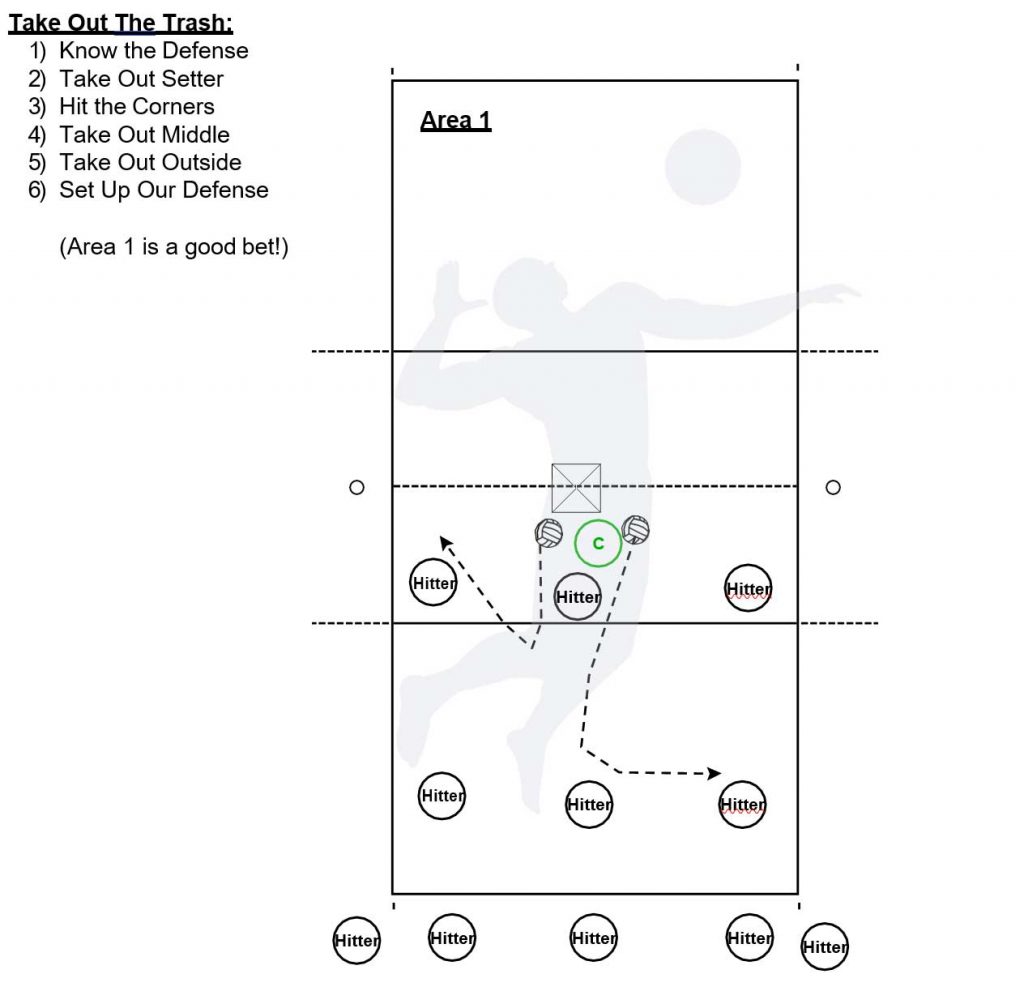
Part 1 – Drill: 3 Hittable vs. Playable Balls 6 on the Court Live and Calling With Priority List
Goal is players calling for the ball. Player then deciding if the ball is hittable or playable. Hittable balls players play overhand and playable balls players play underhand. Players need to learn to be very aggressive with this drill early especially on hittable balls. As the players get more comfortable coaches should demand a higher level of consistency and players having and attack priority. In running this drill coaches should face the net and not see the players. Reps, reps, reps, toss allot of balls and have the players off the court full the holes. Players should be aggressive and try and hit the corners, area 1 and 5.
This drill is chaotic and forces players to concentrate and be aggressive. Also we find the drill works better when the coach hits balls off his fist behind him vs. tossing balls behind him. Hitting results is a more game like contact which is harder to read.
Additionally as players get better add 1 or 2 defenders on the other side, have the players read the defense and try and attack away from the defenders.
Attack priority sequence when “Taking Out the Trash!”
- Know the defense. (Example: Often players can still get a kill if they put the ball in the whole on a perimeter defense or down the line on a setter up defense).
- Take out the setter. (Teams sideout % tend to be significantly lower when the setter contacts the first ball).
- Hit the corners. (This is always a good thing to do when attacking, we find area 1 tends to be the best place to do this as the attacker is hitting the corner and taking out the setter).
- Take out the middle hitter. (Middles often have less ball control skill and often fumble easy shots to them particularly at the youth level. Additionally when the middle plays the first ball they often dig the ball off the net and are not set the ball in transition)
- Take out the outside hitter. (The outside is normally the primary attacker and when they dig a ball on defense this often results in them not getting a good full approach to attack outside)
- Set up our block / defense. (If we set up our block / diggers on defense our percentages tends to be significantly higher)
By having your players pursue this attack hierarchy we find it can significantly lower your opponent’s kill percentage when they dig a ball in transition.
Tipping and Reading
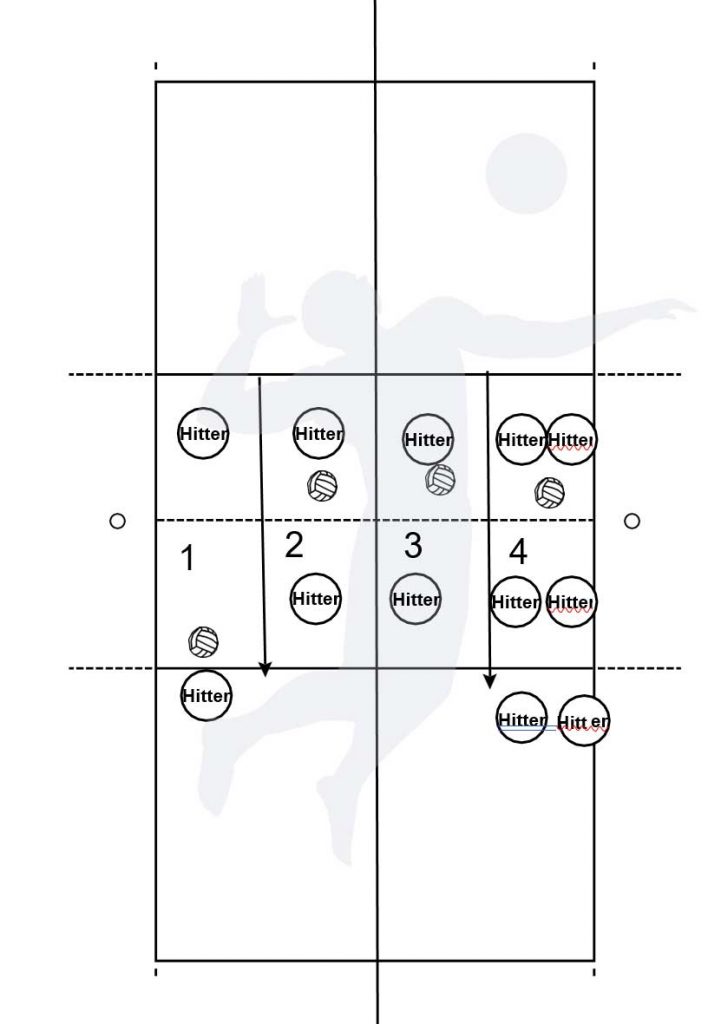
Part 2 – Drill 4: Short Court Mini Games Gauntlet
Part 2 – Drill 4: Short Court Mini Games Gauntlet
The area is divided into 4 short court (10 foot line) mini courts. Depending on the number of players, court 1, 2, 3 is one on one, court 4 is one on one, two on two or two on two queen / king. The team with the highest score on 4 goes and plays on 3 or player with the highest individual score. If two players scores are equal have them rock, paper, scissors to see who moves up. Now this is a gauntlet so winners go up losers go down. So court 1 is the top court, if you win on 1 you stay. if you lose on 1 you go to 2. Winner of 2 goes to 1 and loser of 2 goes to 3. This repeats. I like to run this on 8 mini-courts across two real nets. Its a great way to build friendships with the Varsity and JV players.
Play for time, maybe 2 minutes, then switch.
The game is kind of no rules, serve behind the 10 foot line, tip with both hands, 3 touches, 4 on block allowed. The main goal is the players learn to tip with both hands, read the defense and find the court when attacking. We tend to care less about bad sets, hitting off the antenna and doubles for example.
Make It a Part Of Your Weekly Training
 Part 3: Repeat in Skill Building Warm Ups
Drills 2, 3, and 4 are great skill building warm-up drills for helping players learn how to “Take Out the Trash!” I highly encourage these 3 drills mid way and through the end of the season or after a match when the players are not scoring off good “Hittable Balls!”
Contact me with questions? Andor Gyulai andorvolleyball1on1@gmail.com cell 310-435-5840
Volleyball1on1 Drills – Playable vs Hittable Balls Drill Progression 9-27-17 (PDF of the Drills and more for easy use in Practice)
*Note, this is a module we run at all Volleyball1on1 Camps! See our Volleyball1on1 Camp Schedule Options here!
PS: I want to thank the volleyball legend, Mike Stormin Normand, we developed this drill series together last year at a Volleyball1on1 Camp in Colorado.
Related Resources:
- Video example of Andor Gyulai teaching these concepts at a Volleyball1on1 Camp! (Click Here!)
